


- Master Excel formulas: smartly mix absolute and relative references for consistent markups and scalable calculations.
- Clean data structures matter: avoid stacking multiple values in one cell—separate quantity and description to enable accurate analysis.
- Guide users clearly: use dropdown lists and pop-up messages via Data Validation to standardize entries and prevent mistakes.
- Leverage key tools: use AutoSum, filters, freeze panes, and conditional formatting to simplify data review and flag errors.
While our suggested best practice is to keep your data in the STACK platform and create detailed estimates and proposals directly from your takeoff information, we recognize that not every estimator works the same way. Microsoft Excel has historically been a component in the estimating process for many folks, and we recognize it is still commonly used. Excel is a great tool that not only organizes and analyzes data but also learns your patterns.
If you’re going to continue using the spreadsheet software, we want to provide you with the top dos and don’ts of presenting and analyzing your data. You could have minor errors that add up in the long term, or major ones, like in 2005 when a Kodak employee added too many zeros resulting in an $11 million overstatement. Excel with Excel with our recommended practices:
The Benefits of Using Excel for Construction Estimating
Using Excel for construction estimating brings a range of convenient benefits, making it a preferred choice for many construction professionals:
- Cost-Effectiveness: Excel is often more affordable than dedicated estimating software, which can be expensive to purchase and maintain. For smaller companies or one-off projects, Excel offers a low-cost solution without sacrificing essential estimating capabilities.
- Customizability: Excel’s flexibility allows users to design spreadsheets that cater to specific project requirements. From creating unique cost breakdowns to organizing material and labor lists, Excel can be easily adapted to suit the specific needs of different construction projects.
- Robust Formulas and Functions: Excel provides a wide array of built-in formulas that can handle complex calculations, making it easier to build accurate estimates. By setting up custom formulas, users can calculate everything from material costs to project timelines, reducing the likelihood of costly errors and saving time.
- Integration Capabilities: Excel integrates seamlessly with other software tools, such as project management platforms and material databases, allowing users to pull in additional data as needed. These integrations enhance workflow efficiency, ensuring that estimates are accurate, timely, and reflective of the latest information.
- Familiar Interface: For many users, Excel’s familiar interface is easy to navigate, reducing the learning curve and allowing teams to get started with estimates quickly. This familiarity can also improve collaboration since multiple team members are likely to be proficient with the program.
These advantages can make Excel an, accessible tool for construction professionals who need flexibility and efficiency in their estimating processes, without the added cost or rigidity of specialized software.
How to Set Up a New Spreadsheet for Estimating
Creating a basic Excel spreadsheet for construction estimating involves organizing data in a way that makes it easy to input quantities, apply unit costs, and calculate totals for materials, labor, and other expenses. Here’s a simple guide to setting up your spreadsheet with essential concepts, settings, and requirements.
1. Define Key Sections
Header Information: At the top, include project details like project name, client, date, and estimator’s name.
Cost Categories: Organize sections for different categories of costs, such as:
- • Materials
- • Labor
- • Equipment
- • Subcontractor
- • Overhead and profit
2. Set Up Columns
For each category, create columns that will allow you to track the essential details:
Item Description: Lists each specific item or task, like “Concrete” or “Framing labor.”
Quantity: Enter quantities needed for each item.
Unit of Measure (UoM): Define units (e.g., square feet, cubic yards, hours).
Unit Cost: Input the cost per unit (e.g., cost per square foot of drywall).
Total Cost Calculation: Multiply Quantity by Unit Cost. Use a formula like =B2*C2 to calculate it automatically.
3. Apply Basic Formulas and Functions
Use SUM functions to total costs for each section, e.g., =SUM(D2:D10) for a column of costs.
Add a Grand Total at the bottom to sum all categories.
4. Formatting for Readability
Currency Format: Format cost columns as currency for clarity. Select the cells, go to the Home tab, and click Currency in the format menu.
Borders and Shading: Use cell borders to separate sections and add shading to headers for a clean layout.
5. Creating Templates for Reuse
Save the spreadsheet as a template if you’ll be using it for multiple projects. This way, you can start with a pre-filled structure each time without re-entering formulas and settings.
This setup provides a straightforward, organized way to perform construction estimates, leaving room to add detail and complexity as you gain experience or require more advanced features.
Quick Tip: CTRL + Z These Mistakes, FAST!
It’s easy to make mistakes in complex spreadsheets containing multiple formulas, data sets, and multiple sheets. Undo these common mistakes in your Excel practices:
Don’t leave cells containing formulas unlocked
Your spreadsheets are full of precious data. With one click, your complex formulas or special formatting can disappear. Protect your work from unwanted changes by locking a cell or cell ranges. Go to: Format – Cells – Protection. Hot tip – if you share your spreadsheets with multiple users, you can protect the sheet so other users can’t unlock cells (Tools – Protection – Protect Sheet).
Don’t put multiple values in one field
Give data its own cell. Putting multiple values in one cell makes it nearly impossible to analyze, enter a formula, categorize, or chart. For example, separate quantity and material description into different rows.
Don’t forget to save versions for an audit trail
Excel can’t show you the history of document versions. Remember to save versions of your worksheets as project changes occur so you cover yourself from potential risk or litigation. Hot tip – if using the Office 365 or online version, there is a log feature so changes can be easily identified and tracked to the team member that made them. Cloud spreadsheets for the win!
Top 6 Excel Best Practices for Estimating
1. Absolute and Relative Values
There are two types of cell references in Excel: absolute and relative. When data is copied into another cell, absolute cell formulas will remain constant. For example, if you want to add 20% markup on materials and labor, you can add that fixed value into your cell formula.
Relative cells are the default reference, and those formulas change based on the relative position of rows and columns. You would use this to calculate price by quantity. Hot tip – F4 on your keyboard is a shortcut to switch between absolute, relative, and mixed cell references. Formulas: Absolute =$A$1, Relative =A1.
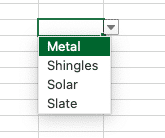
2. Choose from a List
You can create dropdown lists in cells using the Data Validation function. This restricts entries so only values you have preselected are applied to the sheet. This is a great feature when multiple users have access to a workbook. For example, if you’re inputting roofing material names, you can predefine metal, shingles, solar, slate, etc. Go to: Data – Validation – Settings – List.
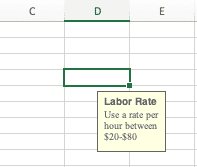
3. Pop-Up Messages for Specific Data
You can choose to show an Input Message when a user highlights a specific cell, giving them guidance about the type of data you want entered. For example, if you’re inputting rates for labor, you can select a range from $20/hr-$80hr, and so on. Hot tip – you can also show an Error Alert when a user enters invalid data, further protecting your estimate from mistakes. Go to: Data – Validation – Input Message.
Bid Faster. Win More. Build Smarter.
Get your FREE account today to:
- Increase Team Efficiency
- Complete Estimates Faster
- Generate More Revenue
4. Use Predefined Selection Options
Excel defined names make it easy to refer to data sets, instead of writing out the cell name each time. It’s time-consuming referencing and typing the exact formulas in cells, especially if you have complex data sets. Giving meaningful names to ranges and individual cells will turn this:
=SUM($A$2:$A$10, $D$2:$D$10)
into this:
=SUM(PRICE, MARKUP)
Go to: Formulas – Define Name.

5. The AutoSum Formula Will Be Your Best Friend
This feature in Excel is probably the most used by estimators, as they need breakdown subtotals and totals of takeoffs, non-measured costs, and labor. In addition to SUM, the small dropdown arrow reveals additional formulas, like AVERAGE, MAX, and MIN. Go to: Formulas – AutoSum.

6. Save Save SAVE
And save again. Seems obvious, but you must make it muscle memory. The risks involved with rework and lost data using on-premise software is high, hence why we recommend doing your estimates within the STACK platform. The good news? If you’re a Microsoft 365 subscriber, Excel will AutoSave your file every few seconds. Hot tip – CTRL + S is the shortcut to save. Go to: File – Save.
5 Useful Functions for Construction Estimates with Excel
1. Freeze Panes
Lock specific rows and columns in place so they are always visible. Go to: View – Freeze Panes.
2. Filter
This function helps with checks and balances, quickly scanning through lists of data, and narrowing information when presenting to others. Go to: Data – Filter.
3. Conditional formatting for color coding data
Conditional formatting allows you to change a cell’s color based on data within the cell. For example, you can flag totals that don’t meet your price per square foot, ensuring you aren’t underbidding. Go to: Conditional Formatting – Highlight Cell Rules.
4. Add multiple rows or columns
If there is a document revision and structures are added to your job, you need to revise your estimate. To add multiple rows or columns, highlight the same number of preexisting rows or columns that you want to add. Then, right-click and select “Insert.”
5. Wrap text
Typing long copy into spreadsheets by default allows the text to continue forever. Make your notes (or novel) legible in the cell. Go to: Format – Cells – Alignment – Wrap Text.
The Drawbacks of Excel and When to Upgrade
Excel is a powerful and widely-used tool in many industries, offering flexibility and simplicity for various tasks, including cost estimation. However, as a business grows, Excel can become challenging to manage effectively, especially in construction and estimating where data complexity and project volume increase over time. Some problems businesses can encounter include:
Scalability Issues:
- Suitable for small projects but struggles with large-scale projects and complex data.
- Large Excel files can slow down, crash, or become difficult to navigate.
- Increased risk of data inaccuracies and lost productivity.
User Competency Requirements:
- Complex formulas and functions require advanced skills.
- Minor errors can result in costly miscalculations.
- Lack of audit trails makes error detection challenging.
Collaboration Challenges:
- Difficult for multiple users to work on the same document.
- Version control issues and outdated information are common.
Upgrading to dedicated construction estimating software like STACK can offer a range of benefits that help companies overcome these limitations. STACK provides cloud-based, centralized project management and estimating capabilities, allowing teams to work on takeoffs and estimates in real-time. It’s built with construction in mind, providing pre-built databases, templates, and tools specifically designed for accurate, efficient estimating.
This also improves scalability, as STACK can handle large volumes of data seamlessly, enabling businesses to take on bigger projects without sacrificing efficiency.
Ultimately, commercial estimating software like STACK enhances accuracy, productivity, and scalability, enabling businesses to keep pace with growth without the limitations inherent in Excel.
Upgrade Excel and Get Free Construction Estimating Software
You can estimate directly in STACK? Our platform offers two types of estimates to cater to your business needs – Unit Cost Estimates and Material and Labor Estimates. With our regional cost data integration, you’re able to automatically pull pricing into your estimate. When you have calculated your selling price and profit, you’ll be able to create a custom, professional proposal within STACK!
If you’re still most comfortable using Excel, you can integrate the software to estimate with STACK. STACK for Excel allows estimators the flexibility to deliver custom reporting with the accuracy of STACK data, giving contractors the insights they need without disrupting existing workflows. Try it now for free!